
Overview
This guide will help you set up the needed configuration in NorthGRC.
You can find Troubleshooting at the bottom
NorthGRC allows for delegation of user management to Microsoft Azure Active Directory. Users authenticate with Azure AD on every login, in order to make sure that only valid users are able to access the content in NorthGRC.
There are two ways to use the Azure integration:
- Delegated user identity, which allows users to login to NorthGRC and get access rights based on their Azure user group memberships.
- Application Identity, which allows NorthGRC to fetch and update information on all users and groups in your Azure AD.
Delegated user identity
This scenario uses OAuth 2.0 authorization code grant with a confidential client. The web application (NorthGRC) redirects the user to the directory server to obtains an access token for the user. The access token is validated by NorthGRC and it proves to the web API (Microsoft Graph) that the user successfully authenticated to the web application and that the web application was able to obtain a delegated user identity to call the web API. This access token is sent in the request to the web API, which authorizes the user and returns the desired resource.
If you validate all your NorthGRC users on one Azure AD, you can set NorthGRC to automatically redirect all authentication request, allowing your users to have Single Sign On.
Application Identity
This scenario uses OAuth 2.0 client credentials grant to authenticate as an application and access the web API. When using an application identity, the web API can only detect that the web application is calling it, as the web API does not receive any information about the user. If the application receives information about the user, it will be sent via the application protocol, and it is not signed by Azure AD. The web API trusts that the web application is authenticated. For this reason, this pattern is called a trusted subsystem.
The Application Permissions and the Implicit grant of Access tokens allows NorthGRC to use the same settings as delegated user identity to request a read access tokens for the nightly update of your users, groups and group membership information.
Configuration
To set up an Azure Active Directory connection, you need to log into NorthGRC with a user that has the security role of “UserManager”.
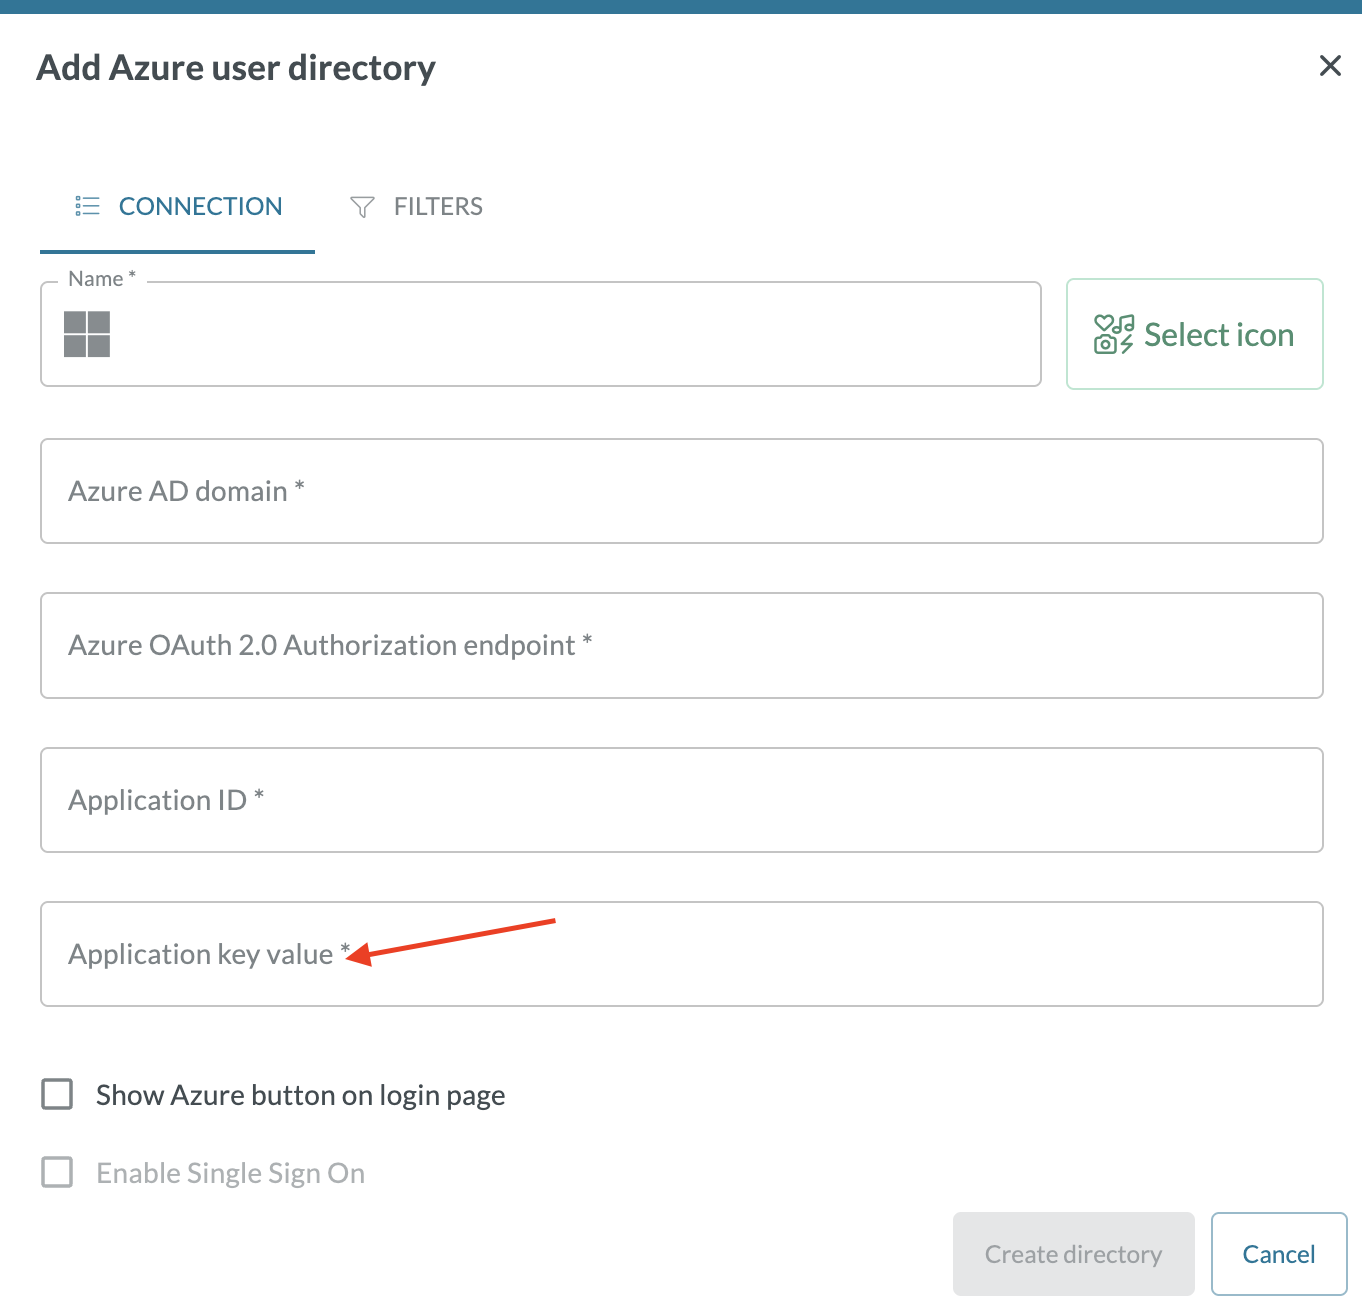
Navigate to Settings > User directories > Add directory > select “Add Azure user directory”.
The “Name” field is for information purposes only and will be shown in the list of directories.

The “Azure AD domain” field is the fully qualified domain name of your Azure active directory.
The endpoint, application ID and key fields must contain information from Azure AD. Follow the instructions in the next section to get these.
The “Show Azure button on login page” will when checked allow your users to be redirected to Azure for login.
When the connection is tested successfully, you have the option to enable SSO (Single Sign On). This will automatically redirect all users to Azure login, allowing users to be logged in without seeing a login form. Only enable this when you are sure that the Azure connection is working.
If you need to access the login form when SSO is enabled, add “/login?skipsso=1” to the URL for your site. This will disable the automatic redirect to Azure authentication for your session, allowing you to log in with a NorthGRC user.
Adding NorthGRC configuration in Azure AD
To allow users in Azure to log into NorthGRC, you need to register NorthGRC as an app. Log into your Microsoft Azure Portal with a user that is allowed to create and manage Azure AD Applications.
Navigate to Azure Active Directory > App registrations > Endpoints and locate the setting for OAuth 2.0 authorization endpoint (v2).
Use the Copy icon to copy the link to the Clipboard. Paste the link into NorthGRC field “Azure OAuth 2.0 Authorization endpoint”
We now need to register a new application.
Navigate to Azure Active Directory > App registrations > New registration.
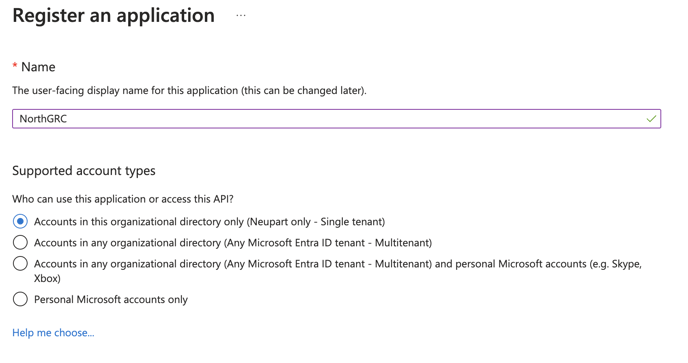
On the registration page, add a name like “NorthGRC”
The name is shown to the users when they are asked to authenticate.
The selected Supported account types should be to allow only users in this single azure directory tenant
In the Redirect URI we need to specify the link that is used to redirect users back to NorthGRC after authentication at Microsoft Azure.

The link is individual to your site. Replace tenantname with the name of your NorthGRC site.
https://tenantname.northgrc.app/azure/auth
Now press Register to finish the application registration.
When registered, the Application ID is located in the Essentials section of the page, and a Copy to clipboard option is available when you move the pointer over the Application ID.
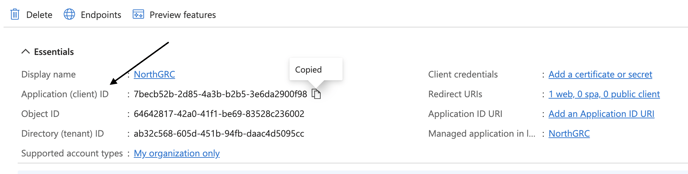
Paste the application ID into the NorthGRC “Application ID” field.
Now we need to allow both Delegated and Application identity, to allow for both user authentication and service authentication for synchronization. In the left side Manage menu, locate and select the Authentication menu item.

On the Authentication page, scroll down to the Implicit grant and hybrid flows section.
Mark both “Access tokens” and “ID tokens” fields and press the Save button at the top.
Next, we need to create a shared secret to allow NorthGRC to access Azure. In the left side Manage menu, locate and select the Certificate and secrets menu item.
In the “Client secrets” section, press “+ New client secret” button.

In the “Description” field enter “App Key Value”. Under “Expires” section, choose the field 24 months, or select custom dates with the interval you prefer. Then press the Add button.
The created secret will be shown, use the Copy to clipboard function to copy the Value column and past it into the NorthGRC “Application Key Value” field.
Azure API permissions
We now need to add permissions so NorthGRC is able to read and synchronize user and group information daily. In the left Manage menu, locate and select the API permissions menu item.
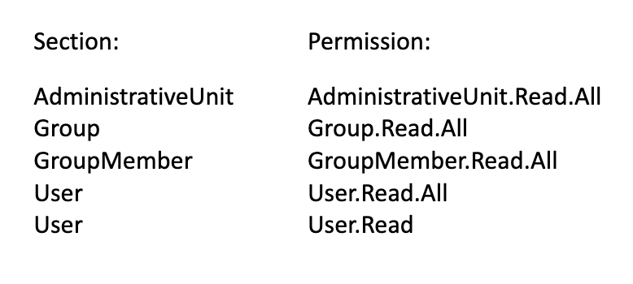
The delegated permission “User.Read” was added by default. You must add another four application permissions, to allow NorthGRC read access for the nightly synching process.
Use the “+ Add a permission” button and select Microsoft Graph API, then select Application permissions.
You can use the search bar at the top to find the following permissions – or scroll down to their respective sections:
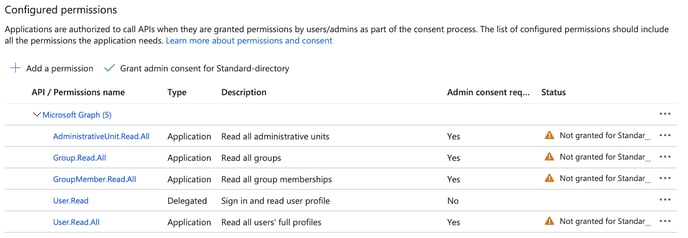
The added permissions require that an Administrator grant the access, use the “Grant admin consent for Standard-directory” button to approve the added permissions.
Testing the connection
When all configuration is set, use the Test connection button to test the LDAPS connection. 
On success, you will be able to setup which users and groups that should be imported.
Filter Settings
Small organizations can select to import all users, but it is recommended to only import users that should have access to NorthGRC.

The recommended option is to use “Select by AD group” and then select one or more groups in the “Import these groups” field.
The Group import is recursive, so groups that contain groups (in multiple levels) and users will also be included.
Using AD groups as filters, effectively moves the responsibility of controlling access to NorthGRC into your Active Directory and enables you to use your existing procedures and user management tools.
Synchronization of users and groups is running in non-office hours, but with the “Synchronize when saving” you can start an extra synchronization of users and groups immediately.
Directory Information

When the AD connection is created, it will be listed on the Settings User Directories page. Here you can edit or delete the settings and view the log information from the last synchronization.
When the connection is synchronizing the users and groups, a progress indication will be shown.
The list also contains how many users and groups that are currently imported from the AD connection. Only users and groups that matches your filters will be imported.
User Login
When an Azure Active Directory connection is defined, you can select to show the Login with Azure AD button.
This will redirect the user to Azure for authentication. On success, the user will return to NorthGRC and will be logged in.
If you selected the SSO option, all users will be redirected automatically.
Troubleshooting
Here are some issues that can arise when defining a connection to your AD servers.
Connection Access denied
Access issues are typically errors in the configuration, expired passwords or certificates.
- Check that the full AD name is spelled right
- Check that the endpoint URL, Application ID and Secret value is correct
- Check that the Azure Application Secret value is not expired.
No Users or Groups imported
This is normally a filter configuration issue or access rights of the defined service user.
- Check the selected filter option (recommend using one or more Security Groups)
- Check that the expected Users and Groups are within the selected filters in AD
- Check that the Azure Application Authentication allows both “Access tokens” and “ID tokens”
- Check that the Azure Application Secret value is not expired.
- Check that the API permissions allows ALL the listed permissions above
- Check that the API permissions have been Granted access by and Azure Administrator
User is not able to log in
- Check that the user is imported from Azure (only imported users can log in)
- The secret key you have created as part of the setup might have expired.
- In this case you need to create a new secret key, and paste the secret key value in to the AD integration in NorthGRC:
To do this you should have an internal user ready, that you can use to access your NorthGRC system outside your Entra ID. If you do not have an internal user, you can ask NorthGRC support to put the value in to your system for you. This will require that you have a support user in your system. If this is not the case, support will have to create a user externally. You can contact NorthGRC support here support@northgrc.com.
- In this case you need to create a new secret key, and paste the secret key value in to the AD integration in NorthGRC: